
2nd December, 2018
How I structured a white labelled react app
I remember a time when React was new and people struggled with the decision of what folder structure you should use to layout your project. Do I put everything in the Components folder? Do we use Screens or Pages for main page components and then put reusable ones inside Components? Do I have 50 index.js files inside of all my folders?
Due to React being a rendering library and not a framework this type of choice was left up to the user, which is both empowering and also for some confusing.
I think today most people know how they like to structure things, and for devs who are new we have docs, Create React App which gives you a starting point or something like Gatsby which gives you a much stricter guideline.
My problem
Recently I was given the challenge of building a proof of concept (PoC) for a new product. We would be looking to build it in React and so the PoC had to not only demonstrate the advantages of building an SPA using React, but also that it could handle things like:
- White label themes
- Simultaneous multi theme deployments
- Environment configurations (dev, staging, production etc)
Having built several React apps before I was not worried about showing off what makes React great. It would however be the first time I have had to create a project for the purpose of white labelling.
I started searching for articles or examples out there that might give me a hint into how other people were handling this problem. Alas I couldn’t really find any - they probably exist but I didn’t find them.
Side Note: Whilst every example for React Context references themeing - it is talking about runtime themes. I am not looking for runtime themes at the moment - build time themes are my need right now.
My inspiration
I turned to the our mobile apps, we use a hybrid mobile framework that supports themes (build time themes) out of the box as well as environment variables.
I set about thinking how I could get webpack to provide me with the same build time configuration.
I knew about webpack resolve.alias and so I set about figuring out how to leverage this for my solution.
My solution
The aim of this article is not to preach a solution for all projects, but to provide a solution so that people who are looking for a way to pull this off - and are lost - have something to follow.
Step 1 - File Structure
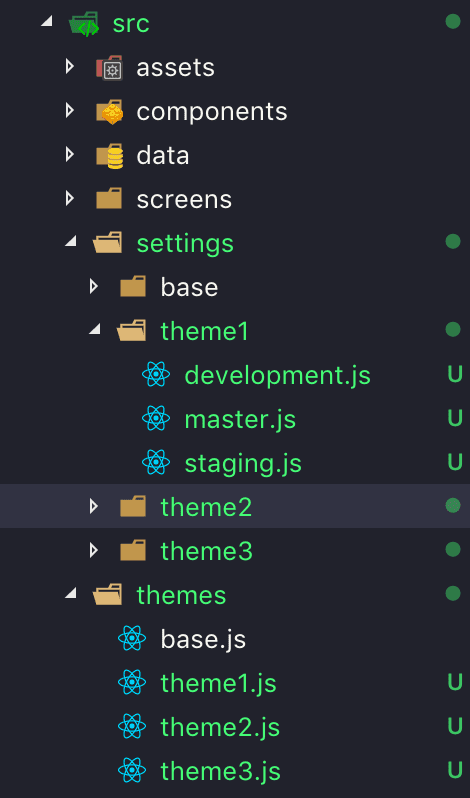
I started by adding 2 new folders to my src folder:
- settings
- themes
Anything that relates to a particular theme but is environment specific we place in the settings theme/environment file.
An example of some things that I am putting in here is:
settings/base/development.js
export default {
  versionName: 'AAA',
  versionNumber: '0.0.1',
  baseUrl: 'http://localhost:3000/',
  apiUrl: 'http://localhost:8000/',
}
settings/theme1/development.js
import base from '../base/development'

export default Object.assign({}, base, {
  apiVersion: `DEV-Theme1-ProjectName-${base.versionNumber}`,
  version: `DEV-Theme1-${base.versionName}-${base.versionNumber}`,
})
You could imagine using this to specify a different API URL for local dev / test / staging / production, among other settings. You might also have API keys or other settings you want to store here.
An example of things in the theme files:
themes/base.js
const darkGray = '#9B9B9B'
const midGray = '#D7D7D7'
const lightGray = '#EEEFEF'

export default {
  colors: {
    darkGray,
    midGray,
    lightGray,
  }
}
themes/theme1.js
import base from './base'

const primary = '#3498DB'
const secondary = '#F26723'

export default Object.assign({}, base, {
  mainLogo: 'logo.png',
  colors: Object.assign({}, base.colors, {
    primary,
    secondary,
  }),
})
This should provide the flexibility to have base settings that can be overridden per theme and also per environment.
Step 2: Set the theme
My initial thought was to simply set this in my package.json file:
{
  ...
  "themeName": "theme1"
  ...
}
whilst this does work well for local development, I ran into problems trying to use this for automated deployments.
I decided that the best approach was to use this for local dev - and then use actual process.env.THEME_NAME when building for production.
Step 3: Webpack resolve.alias
Create aliases to import or require certain modules more easily
module.exports = {
  //...
  resolve: {
    alias: {
      Utilities: path.resolve(__dirname, 'src/utilities/'),
      Templates: path.resolve(__dirname, 'src/templates/')
    }
  }
};
So webpack can create aliases for us to make importing easier
🤔; how about then instead of simply making importing files easier, we actually just point to the correct file based on what theme we might want to use and what NODE_ENV we are in.
NB: production config
const themePath = path.resolve(__dirname, `../src/themes/${process.env.THEME_NAME}.js`);
const settingsBase = path.resolve(__dirname, `../src/settings/${process.env.THEME_NAME}`);
let settingsPath = '';
if (process.env.NODE_ENV === 'development') {
  settingsPath = `${settingsBase}/development.js`;
} else if (process.env.NODE_ENV === 'staging') {
  settingsPath = `${settingsBase}/staging.js`;
} else {
  settingsPath = `${settingsBase}/master.js`;
}

module.exports = {
  //...
  resolve: {
    alias: {
      theme: themePath,
      settings: settingsPath,
    }
  }
};
Now throughout the app we can simply:
import theme from 'theme'

console.log(theme.mainLogo) // logo.png
Building an API Integration Test service, using the Serverless Framework and Mocha
12th August, 2019
Recently at my workplace there was a need to create an external running service responsible for running integration tests against all the…
That sinking feeling
5th February, 2019
Your stomach drops, you feel the sweat start to bead on your forehead, you start saying “no” a lot probably in quick succession. You have…
The three dots of Javascript {...}
5th November, 2018
If you have been reading Javascript lately you might have come across the three dots (ellipsis) in one form or another. If you saw this in a…